
The root user is the top-level user with super user privileges that can have complete access of all the system files. This is dangerous if any potential hacker gets access to the server, they can mend with any files in a hazardous manner and jeopardize the server.
This is why, it is important to disable the root user. So that half of the problem is already solved, as most or all of the Linux based servers have a default and super-user called root. The hacker won’t be able to try to access the server using root if it is disabled.
Things to take note of before disabling root user
You must create another user account and provide root-level privileges to the account
Disabling the root user account
- Login to your server through Putty by your user-account (other than root)
- Make sure that this account is able to perform root-level operations
- Copy the file /etc/ssh/sshd_config to the home directory of your account
$ sudo su
					Output
[sudo] password for yourAccount:
- Enter your account’s password which you used to login to Putty and press Enter. The password that you type will not be visible on the Shell. Please note that the word ‘yourAccount‘ will actually appear to be your user-account’s name on your shell.
- After this, navigate to the Home directory of your user-account by typing the command:
$ cd /home/yourAccount
- Then you must copy the file sshd_config which resides at /etc/ssh to your Home Directory using the following command:
$ cp /etc/ssh/sshd_config sshd_config
- The reason why this file has to be copied to the Home Directory is because, it is dangerous to edit the file while it is being used.
- Hence, we make a copy of it and safely make changes into this copied file.
- Using WinSCP, login to the server using the same user-account from which you have logged in to Putty.
- Once logged in to WinSCP, navigate to the directory /home/yourAccount and right click on the file sshd_config and click Edit.
- The file contents will appear as shown below:
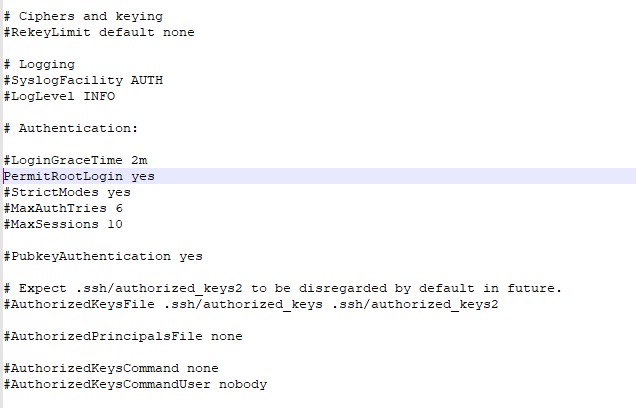
- Search for all instances of the string ‘PermitRootLogin’
- If you see the picture, the PermitRootLogin value is yes
- Change the value to no
- Also, ensure that there is no # before the PermitRootLogin
- Make sure to change the value to no for all instances of PermitRootLogin in that file, as shown below:

- Click Save and Close the file.
- Now, we need to put this file back to its original destination, that is, /etc/ssh
- Switch back to the Putty Shell window and type the below command (assuming that you are still in the Home Directory in the shell and sudo mode):
$ cp sshd_config /etc/ssh/sshd_config
- It is necessary to restart the sshd in order to apply the changes.
- Run the below command in the shell:
$ systemctl restart sshd.service
- To confirm that the root account has been disabled, open a new instance of Putty and try to Login with your root username and its password.
- If it does not let you in, then Hola !! You have successfully deactivated the root user.
